Modifications to Main/Jib
sheeting system on the
Phantom Yacht
General Introduction
One of
the many frustrating things about the phantom is the sheeting
system used to control the main and jib sheets. While the
winch is OK - quite powerful and not too slow, the sheets are
held in place on the drums by a close fitting plastic shroud.
When under tension from the wind, the system works fine but if
the conditions are light then as the sails are let out the turns
on the drums do not run out of the shroud and wind over
themselves. This often means that the next time the sails
are pulled in the sheets pull in much further than they should
often with the jib and main sheets no longer in sync - bad!.
The way
to overcome this is to maintain a constant tension on the cords
which wrap around the drum
Version 1 - Ben M is a complete loop
system involving both winch drums and a rubber band in the loop
to maintain tension.
Version 2 Paul H is a simpler system using
only one drum and a length of shock cord to maintain tension.
Version 3 Bob Edgecombe is a quite
sophisticated but elegant solution to this problem
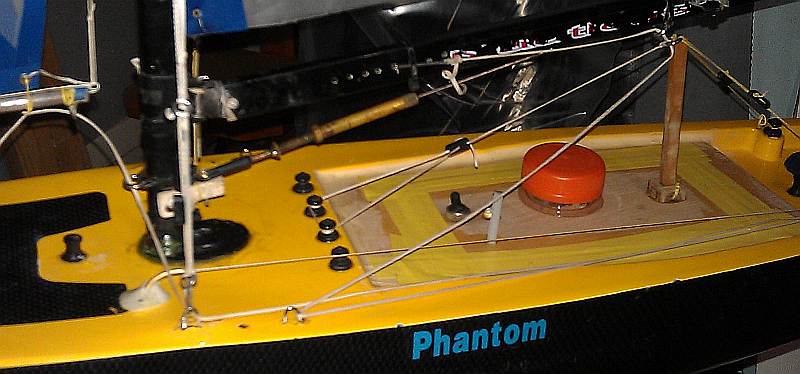
Version 1
One of the simplest ways of doing
this is to make a continuous loop which winds up on one drum and
winds out on the other.
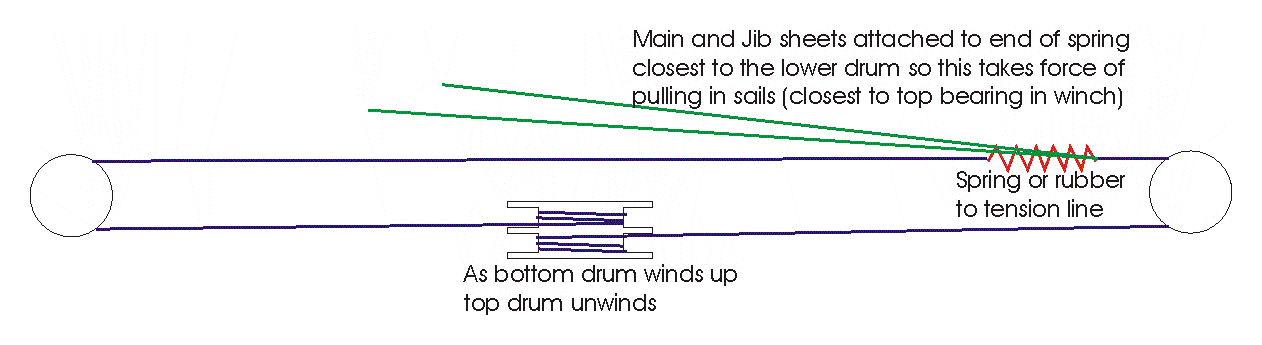
Note
that the cords wrapped around the drums are now in opposite
directions exiting on the same side. The line is joined by
coiled spring or rubber bands slightly stretched to maintain
tension in the loop. I have used silicone rubber bands as
used in cooking as these are UV resistant and don't perish.
The loop is set up so that when the sail control is fully in the
spring is near one end. The lower drum has about 5 turns
while the top drum only 1 or 2 turns. This means when the
sail control is set to the fully out position, the spring moves
to the other end of the top part of the loop with 5 or so turns
on the top drum and 1 on the bottom. This gives about the
300-350 mm of movement needed. The main and jib sheets are
both attached to the end of the spring nearest the bottom drum -
important!. This means the bottom drum takes all the
strain of pulling the sails in. This is good as this drum
is nearest to the bearing in the winch and reduces wear.
The top drum simply maintains tension in the loop.
The
drums and bottom part of the loop are below decks while the
spring and top part are above deck. The turning mechanism
at both ends of the loop are about 400-500 mm apart.
 While
it's possible to buy small deck blocks for turning the loop I
chose to use the easier and cheaper option of bending fine brass
tubing into a 180° hook and
belled the two open ends with a fine punch. The cord is fed
through the brass and slides with surprisingly little friction
using spectra or dyneema cord.
While
it's possible to buy small deck blocks for turning the loop I
chose to use the easier and cheaper option of bending fine brass
tubing into a 180° hook and
belled the two open ends with a fine punch. The cord is fed
through the brass and slides with surprisingly little friction
using spectra or dyneema cord.
While I made a former to assist
this bend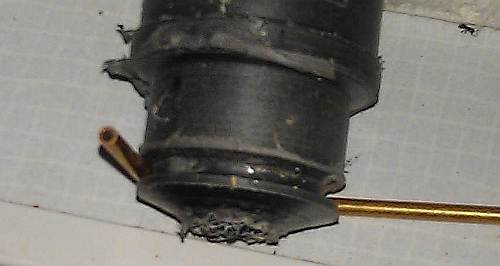 by channelling a groove around a piece of plastic,
bending it gently around a thumb can work OK. Aim for
about a 20mm diameter curve. The brass tube is fed through
a small hole drilled in the deck and the loop set up with
tension. This holds the brass in position which can then
be glued in position.
by channelling a groove around a piece of plastic,
bending it gently around a thumb can work OK. Aim for
about a 20mm diameter curve. The brass tube is fed through
a small hole drilled in the deck and the loop set up with
tension. This holds the brass in position which can then
be glued in position.
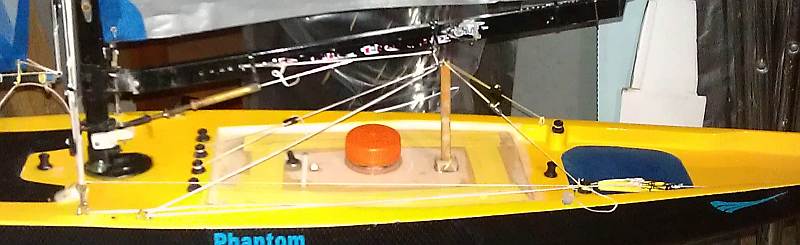
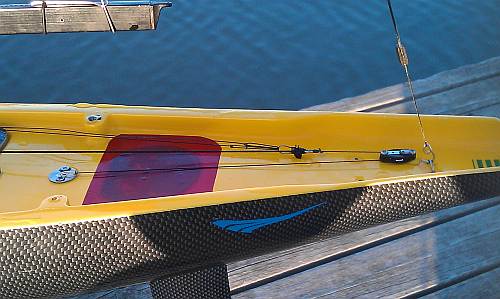
Because both main and jib
sheets attach to the cord and are pulled in the same direction,
one of them will need to be redirected back to reach the boom
sheeting position. I had one brass turning loop near the
transom and the other near the mast position giving me the 45mm
I needed. This means there is a direct pull set up for the
jib but the main needs to go forwards around a turning point
near the mast then back to the main sheeting point.
This does require a new
sheeting point for the main and jib. The jib is easy as
the existing outlet could be used with a metal loop glued in it
while the main sheeting point has previously been discussed in
the 'Mainsheet Fairlead' page
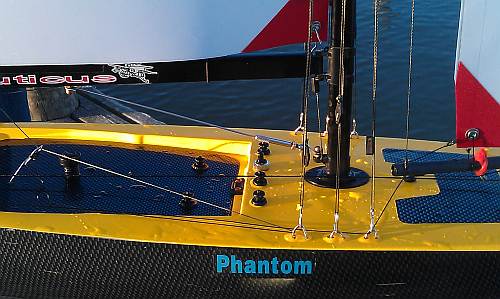
previously
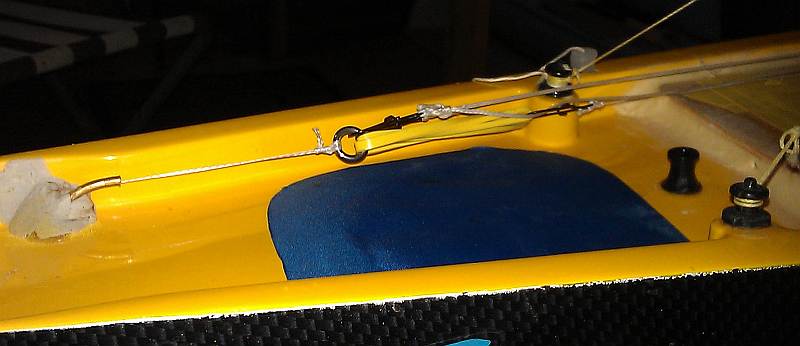
The only other change was to
slightly alter the direction the tension cord enters the top
drum as it was angled up a little too much to ensure it didn't
ride off. See the image to show one way of doing this.
Does it
work? Definitely! No more pulling the sheets in to
find they go too tight, no more letting the sheets out and not
having them move far. The booms go exactly where they
should according to the control on your radio in even the
gentlest of breezes.
Version 2
Thanks to Paul H for this system. It is simpler to
construct as there is only one exiting point rather than two
with the sheet wrapping around the bottom drum only running to
the rear of the deck and exiting via a tube similar to the above
method.
 The sheet now runs aft around a turning block then forward
sufficiently to allow main and jib sheet attachment and ends
with a length of hat elastic or similar carried all the way
forward to maintain pressure on the sheet and keep it on the
drum.
The sheet now runs aft around a turning block then forward
sufficiently to allow main and jib sheet attachment and ends
with a length of hat elastic or similar carried all the way
forward to maintain pressure on the sheet and keep it on the
drum.
The
jib sheets are led forward direct to a jib sheet fairlead set
into the original jib sheeting exit point while the mainsheet is
led forward to a turning point using one of the shroud
attachments and back to the mainsheet fairlead.
Paul
has used this system only the once so far with no issues (and
won the day!). It certainly seems to be the simplest way
to solve the poor original sheeting system.
Version 3 thanks to Bob Egdecombe
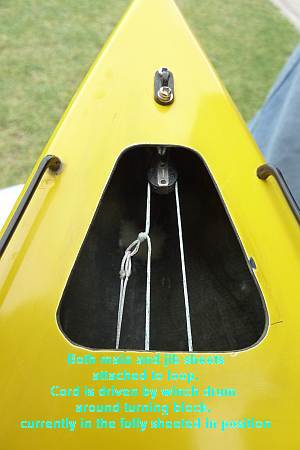 This
version like version 1 uses the two winch drums to wind a loop
of cord in and out around a turning block. The
interesting idea here is its all under deck. An inspection
hatch was cut out near the front of the yacht and a turning
block secured there. The open area is later covered with
stickyback sail cloth. A loop in the cord allows the two
sheets to be attached and during sail pull in are dragged
forward. The mainsail cord goes directly to the existing
mainsheet exit fitting (through a wire loop just to keep it in
position) while the jib sheet loops back through a wire loop
then back to the existing jib sheet fitting. The need to
loop the jib sheet around a wire loop is to ensure enough
movement is obtained in the jib sheet (~ 30 cms or so).
Notice that this does not use the winch drum cover - never a
good idea!!
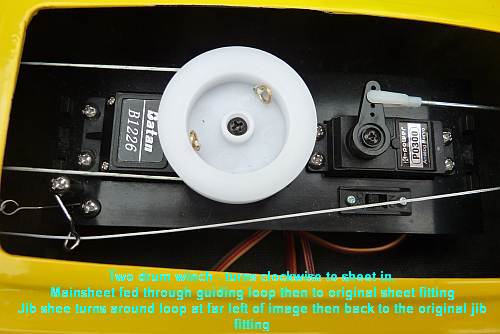
This
version like version 1 uses the two winch drums to wind a loop
of cord in and out around a turning block. The
interesting idea here is its all under deck. An inspection
hatch was cut out near the front of the yacht and a turning
block secured there. The open area is later covered with
stickyback sail cloth. A loop in the cord allows the two
sheets to be attached and during sail pull in are dragged
forward. The mainsail cord goes directly to the existing
mainsheet exit fitting (through a wire loop just to keep it in
position) while the jib sheet loops back through a wire loop
then back to the existing jib sheet fitting. The need to
loop the jib sheet around a wire loop is to ensure enough
movement is obtained in the jib sheet (~ 30 cms or so).
Notice that this does not use the winch drum cover - never a
good idea!!
page
last edited on
15/10/2024